Blog do projektu Open Source JavaHotel

czwartek, 1 listopada 2012

Borland C++, BDE and HADR

Introduction
DB2 HADR works not only with ODBC, JDBC or any other officially supported by IBM connection methods but also with some less common although very popular technologies, even deprecated.
Borland BDE is deprecated and replaced by dbExpress.  Embarcadero discourages using BDE and recommends migration to dbExpress, although BDE framework is delivered with every version of Borland.
http://docwiki.embarcadero.com/RADStudio/XE3/en/Borland_Database_Engine
Warning: The Borland Database Engine (BDE) has been deprecated, so BDE will not be enhanced. For instance, BDE will never have Unicode support. You should not undertake new development with BDE. Consider migrating your existing database applications from BDE to dbExpress.
So it does not make any sense to develop a new software using this technology. But there is still a lot of legacy systems based on BDE and very often from business point of view it is more cost effective to maintain it then migrate to dbExpress. dbExpress is not backward compatible with BDE and switching to dbExpress requires code modification meaning costs and regression risk.
HADR
Although BDE is deprecated starting from 2000 it is still possible to benefit from HADR especially if BDE-ODBC connection is utilized.
To prove it I created simple Borland C++ console application using trial version of latest  C++ Builder XE3. Source code is available here. I used also latest DB2 10.1 version as a database server. HADR is not shipped with free DB2 Express-C version but for evaluating purpose DB2 trial (90 days) download can be used.
HADR setup
How to setup and test HADR environment is described here. On client (Windows) machine it is necessary to download and install IBM Data Server client software. Valid ODBC entry for DB2 should be configured and working.
BDE setup
Although deprecated BDE Administrator software is delivered with XE3 framework. BDE administrator allows to create BDE data source based on ODBC entry. In this example it is assumed that the name of BDE entry is named DB2HAD1 and U/P is DB2HAD1/DB2HAD1
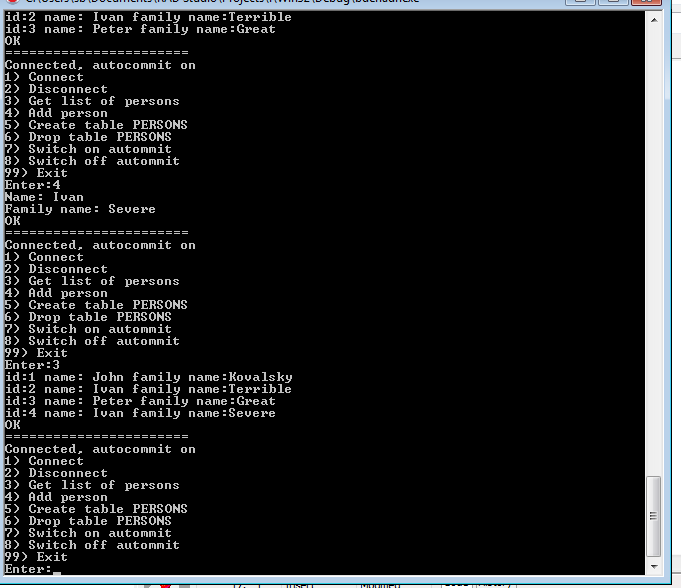
Console program
hadrmodel.h and hadrmodel.cpp encapsulates BDE access to database. On the top of it there is a simple console application.


HADR and BDE
Because BDE-DB2 access method is based on ODBC the application is HADR enabled by virtue of DB2 client and nothing specific is necessary. DB2 client recognizes HADR failover and switches connection to stand-by server.
The main and only problem is related to SQL30108N sql error (connection has been re-established). To resolve that issue I created a simple class which encapsulates all SQL related code.

// common class for running SQL related commands
class ExecuteCommand {

        virtual void command() = 0;

        bool trans;

        TQuery *query;

protected:
        TQuery *getQ(const char *s) {
                query = new TQuery(model->T());
                query->SQL->Add(s);
                return query;
        }

public:
        ExecuteCommand(hadrmodel * p, bool ptrans) : model(p), trans(ptrans) {
                query = NULL;
        }

        void go() {
                if (model->T() == NULL) {
                        model->lastActionStatus = "Not connected";
                        return;
                }
                bool tryagain = true;
                bool first = true;
                // loop could be executed twice in case of RECREATE_CONNECTION error
                while (tryagain) {
                        tryagain = false;
                        try {
                                // BDE: autocommit takes place if ExecSQL command is issued
                                // without StartTransaction
                                if (trans && !model->autocommit) {
                                        model->T()->StartTransaction();
                                }
                                command();
                                if ((model->T() != NULL) && model->T()->InTransaction) {
                                        model->T()->Commit();
                                }
                                model->lastActionStatus = "OK";
                        }
                        catch (EDBEngineError &e) {
                                UnicodeString s = e.Message;
                                to_string(model->lastActionStatus, s);
                                std::string code;
                                to_sqlcode(code, s);
                                if (code.compare(CONN_AGAIN) == 0 && first) {
                                        // run again but only once
                                        // secondly throws exception
                                        tryagain = true;
                                        first = false;
                                }
                        }
                        catch (...) {
                                model->lastActionStatus = "SQL non EDBEngineError error";
                        }
                } // while
                if (query != NULL) {
                        query->Close();
                        delete query;
                }

        }

protected:
        hadrmodel * model;
};
This way handling SQL30108N error is resolved in one place and the application becomes HADR transparent.
Another simple problem was related to obtaining SQL error code. I was unable to  find any ready to use method so I created a simple procedure for searching and extracting SQL code from SQL error message.
     // extracts SQL code (4 or 5 digits) from SQLERR string
        void to_sqlcode(std::string &st, const UnicodeString &s) {
                int start = 0;
                UnicodeString sPos = s;
                st.clear();
                // look for SQL substring
                while (true) {
                        sPos = s.SubString(start, 1000);
                        int p = sPos.Pos("SQL");
                        if (p == 0) {
                                break;
                        }
                        p--;
                        // firstly check for 4 digits (ends up with 'N')
                        int npos = p + 7;
                        if (npos >= s.Length()) {
                                break;
                        }
                        wchar_t w = sPos.c_str()[npos];
                        if (w == 'N') {
                                // ok, 4 digits error code
                                to_string(st, sPos.SubString(p + 4, 4));
                                break;
                        }
                        // secondly look for 5 digits
                        npos = p + 8;
                        if (npos >= s.Length()) {
                                break;
                        }
                        w = sPos.c_str()[npos];
                        if (w != 'N') {
                                start = npos;
                                // look for next SQL substring (if exists)
                                continue;
                        }
                        // ok, 5 digits
                        to_string(st, sPos.SubString(p + 4, 5));
                        break;
                }
        }
}

Conclusion
By virtue of IBM Data Server Client it is possible to enable for HADR even deprecated technologies like Borland BDE. Putting aside SQL30108N sql error no code changes are necessary so even legacy systems can benefit from DB2 HADR.
If we want to save the user from pain of repeating the last transaction in case of takeover (SQL30108N code) code fixes are necessary. But with the help of small refactoring it is possible to make the application fully HADR transparent even for deprecated connection method.

piątek, 19 października 2012

CVS and AIX

Introduction
AIX does not come with CVS (client and server) installed. But it is quite easy to install them and transform our AIX server also to CVS server.
IBM AIX Toolbox and rpm
It is a set of GNU Open Source tools compiled for AIX from source files. Ready to use packages are available here: IBM AIX Toolbox download information. Before downloading read carefully licensing and installation instructions. Those packages are installed as RPM packages so make sure that your AIX has rpm already installed. Just run:
-bash-3.2# rpm --version
RPM version 3.0.5
-bash-3.2#
If rpm is not installed then install it first.
Download
Download two packages: zlib and csv. Rpm files for these packages should be like: zlib-1.2.3-4.aix5.2.ppc.rpm and cvs-1.11.17-3.aix5.1.ppc.rpm
Install
As root user:
rpm -i zlib-1.2.3-4.aix5.2.ppc.rpm
rpm -i cvs-1.11.17-3.aix5.1.ppc.rpm
Verify that cvs is installed:
-bash-3.2# cvs -version
Concurrent Versions System (CVS) 1.11.17 (client/server)
Copyright (c) 1989-2004 Brian Berliner, david d `zoo' zuhn,
Jeff Polk, and other authors
CVS may be copied only under the terms of the GNU General Public License,
a copy of which can be found with the CVS distribution kit.
Specify the --help option for further information about CVS
Add user cvs
Add user cvs who will be the owner of cvs repositories.
useradd -m cvs
Check the service 
As a root user verify that the file /etc/services contains entries:
cvspserver 2401/tcp # cvspserver
cvspserver 2401/udp # cvspserver
Create repository directory 
Login as user cvs and create the first repository.
cvs -d /home/cvs/cvstest init
Create a list of authorized users. File: vi /home/cvs/cvstest/CVSROOT/passwd
john::cvs
marry::cvs
ivan::cvs
Add the repository just created to the list of attended repositories. 
As a root user add an entry to the /etc/inetd.conf
cvspserver stream tcp nowait cvs /usr/bin/cvs cvs --allow-root=/home/cvs/cvstest pserver
Restart the service
refresh -s inetd
Test if everything is running 
From another computer run the command:
cvs -d :pserver:ivan@aixhost:/home/cvs/cvstest login
If everything is ok then this command should be completed without any message.
Create the first project:
mkdir proj
vi proj/file.txt
And import this project into repository as a repository module
cvs -d :pserver:marry@aixhost:/home/cvs/cvstest import -m "Initial import" proj proj start
Then move to another catalog or use another computer and checkout the project just created.
cvs -d :pserver:john@aixj:/home/cvs/cvstest checkout proj
If the project content is recreated it means that our repository is running and ready to act as a host for our next big project.
Add next repository. 
It is very simple now. Just create next repository directory - for instance
cvs -d /home/cvs/cvsprod init
Add list of authorized users.
vi /home/cvs/cvsprod/CVSROOT/passwd
Modify a line in the /etc/inetd.conf (important: all repositories entries should be included in one line)
cvspserver stream tcp nowait cvs /usr/bin/cvs cvs --allow-root=/home/cvs/cvstest --allow-root=/home/cvs/cvsprod pserver
Restart
refresh -s inetd
And next repository is ready to use.

czwartek, 18 października 2012

New version of JSPWiki

I uploaded a new version of JSPWiki. It has attachment feature enabled, one can download and upload attachments to the pages. An example of page having attachment added - look here.
To keep attachments a Blob data type is used. Source code to entity is here, it is simple key (page name) -> Blob content schema. So it shares 1MB limitation of blob size.
It is possible to overcome this limitation by using Google App Engine Blobstore service , no problem to replace WikiPageBlob entity with Blobstore Api. It is also possible to combine this two options together, attachments less then 1MB keep in entity, for greater attachment use Blobstore service.

piątek, 28 września 2012

db2odbc_fdw, db2 and postgresql

Introduction
Postgresql FDW and ODBC allows to get access to all databases having ODBC interface. But I'm not happy with this odbc_fdw implementation and decided to create my own.
Implementation
The source code is available here. Just download, read README file and make install. At the beginning I planned to create DB2 specific fdw using CLI, (Call Level Interface) but because DB2 CLI is almost identical with ODBC I decided to implement purely ODBC interface.
Comparison with odbc_fdw
  • Much smaller (600 lines of source code against 1200)
  • Simpler : just define DSN name, ODBC credentials mapping and query to run
  • Full signalling of connection and query errors.
  • Proper handling of NULL value
Problems
  • Wrapper reconnects with ODBC database every time foreign table is scanned. The performance could suffer that way. Maybe worth considering is connecting only for the first time and next time table is scanned just reuse connection opened before. But it requires passing state between wrapper invocation and could be the source of several problem.
  • Tuple is created by PostgreSQL API method BuildTupleFromCStrings. So ODBC firstly decodes all columns to string and later PostgreSQL engine encodes these string to appropriate format. Maybe performance would improve if direct data type were used without string intermediary format. 
  • For some reason DB2 decimal are converted to string format using coma (,) as decimal character. But posgresql expected dot (.) as decimal character so rather awkward solution (for number data types replace all , with .) is used. Some more elegant solution is needed.
  • PlanForeignScan is implemented in a simple way - just put some constant values. odbc_fdw solution run (select * from .) query to retrieve number of rows in the query. But using this solution means performance degradation - instead of one query two queries are executed. So in search of more advanced solution without performance degradation.
  • What about 'big' columns like: LOB, BLOB etc.
Future
The solution was tested on Fedora 17 (64 bit) against DB2 10.0 database. Next step is to test db2odbc_fdw wrapper against other databases and also test it on Windows platform. But to accomplish it I'm planning to prepare some regression test and run this test again every database. The main purpose is to check if all standard data types are converted correctly.


czwartek, 13 września 2012

CellTable and line wrapping

Introduction
In the previous (before GWT 2.4) it was difficult to add "no wrap" attribute to the CellTable.


It was easy while creating user interface in HTML/CSS - just add "no-wrap" attribute to
tag or "white-space: nowrap" style. But it was difficult in GWT because there was no direct API for modifying (cell) attribute.
The only solution I found was to make copy and paste of DefaultCellTableBuilder and and modify it a little bit.


/**
 * IMPORTANT: copy and paste of DefaultCellTableBuilder. The only difference is
 * to add "nowrap" to td tag. Because all attributes in class are private I have
 * to copy also constructor with all attributes (cannot extends
 * DefaultCellTableBuilder)
 * 
 */

class MyCellTableBuilder<T> extends AbstractCellTableBuilder<T> {

    private final String evenRowStyle;
    private final String oddRowStyle;
    private final String selectedRowStyle;
    private final String cellStyle;
    private final String evenCellStyle;
    private final String oddCellStyle;
    private final String firstColumnStyle;
    private final String lastColumnStyle;
    private final String selectedCellStyle;

    // enhancement
    private boolean addNoWrap = false;
    
    /**
     * @return the addNoWrap
     */
    boolean isAddNoWrap() {
        return addNoWrap;
    }

    /**
     * @param addNoWrap the addNoWrap to set
     */
    void setAddNoWrap(boolean addNoWrap) {
        this.addNoWrap = addNoWrap;
    }
    // ===========


    MyCellTableBuilder(AbstractCellTable<T> cellTable) {
        super(cellTable);

        // Cache styles for faster access.
        Style style = cellTable.getResources().style();
        evenRowStyle = style.evenRow();
        oddRowStyle = style.oddRow();
        selectedRowStyle = " " + style.selectedRow();
        cellStyle = style.cell();
        evenCellStyle = " " + style.evenRowCell();
        oddCellStyle = " " + style.oddRowCell();
        firstColumnStyle = " " + style.firstColumn();
        lastColumnStyle = " " + style.lastColumn();
        selectedCellStyle = " " + style.selectedRowCell();
    }

    @Override
    public void buildRowImpl(T rowValue, int absRowIndex) {

        // Calculate the row styles.
        SelectionModel<? super T> selectionModel = cellTable
                .getSelectionModel();
        boolean isSelected = (selectionModel == null || rowValue == null) ? false
                : selectionModel.isSelected(rowValue);
        boolean isEven = absRowIndex % 2 == 0;
        StringBuilder trClasses = new StringBuilder(isEven ? evenRowStyle
                : oddRowStyle);
        if (isSelected) {
            trClasses.append(selectedRowStyle);
        }

        // Add custom row styles.
        RowStyles<T> rowStyles = cellTable.getRowStyles();
        if (rowStyles != null) {
            String extraRowStyles = rowStyles.getStyleNames(rowValue,
                    absRowIndex);
            if (extraRowStyles != null) {
                trClasses.append(" ").append(extraRowStyles);
            }
        }

        // Build the row.
        TableRowBuilder tr = startRow();
        tr.className(trClasses.toString());

        // Build the columns.
        int columnCount = cellTable.getColumnCount();
        for (int curColumn = 0; curColumn < columnCount; curColumn++) {
            Column<T, ?> column = cellTable.getColumn(curColumn);
            // Create the cell styles.
            StringBuilder tdClasses = new StringBuilder(cellStyle);
            tdClasses.append(isEven ? evenCellStyle : oddCellStyle);
            if (curColumn == 0) {
                tdClasses.append(firstColumnStyle);
            }
            if (isSelected) {
                tdClasses.append(selectedCellStyle);
            }
            // The first and last column could be the same column.
            if (curColumn == columnCount - 1) {
                tdClasses.append(lastColumnStyle);
            }

            // Add class names specific to the cell.
            Context context = new Context(absRowIndex, curColumn,
                    cellTable.getValueKey(rowValue));
            String cellStyles = column.getCellStyleNames(context, rowValue);
            if (cellStyles != null) {
                tdClasses.append(" " + cellStyles);
            }

            // Build the cell.
            HorizontalAlignmentConstant hAlign = column
                    .getHorizontalAlignment();
            VerticalAlignmentConstant vAlign = column.getVerticalAlignment();
            TableCellBuilder td = tr.startTD();
            td.className(tdClasses.toString());
            if (hAlign != null) {
                td.align(hAlign.getTextAlignString());
            }
            if (vAlign != null) {
                td.vAlign(vAlign.getVerticalAlignString());
            }
            // wrap enhancement
            if (addNoWrap) {
              td.attribute("nowrap", "true");
            }

            // Add the inner div.
            DivBuilder div = td.startDiv();
            div.style().outlineStyle(OutlineStyle.NONE).endStyle();

            // Render the cell into the div.
            renderCell(div, context, column, rowValue);

            // End the cell.
            div.endDiv();
            td.endTD();
        }

        // End the row.
        tr.endTR();
    }
}

The only important difference is
 // wrap enhancement
            if (addNoWrap) {
              td.attribute("nowrap", "true");
            }
in the middle. But because of code duplication I felt unhappy with that rather lame solution.
How it can be resolved now
Starting from GWT 2.4 version things have looked better because additional method setCellStyleName was added to the  Column interface which resolved the issue. So the solution now is:
Add class name to the css file.
.no_wrap_cell_style {
  white-space: nowrap;
}
And main code now is (source file PresentationTable)
    @Override
    public void setNoWrap(boolean noWrap) {
        for (int i = 0; i < table.getColumnCount(); i++) {
            Column co = table.getColumn(i);
            co.setCellStyleNames(noWrap ? "" : IConsts.nowrapStyle);
        }
        table.redraw();
    }
Demo version is available here. "FindTest"->"Ustawienia"->"Zawijaj linie"

piątek, 7 września 2012

DB2, HADR and J2EE

Introduction
HADR works perfectly with stand alone Java application using Driver Manager interface. But what about Web applications where common practice is a connection by means of DataSource ?
Sample application
 To check it I created a simple GWT application (running on Tomcat container) connecting to HADR enabled DB2 and doing several simple actions like before. Full source code is available here. I reused the whole interface and implementation of IJDBCAction without changing any single line.
The application itself looks like (I did not pay too much attention to GUI design)


It is nothing more but Web (GWT) interface to IJDBCAction.
The only difference is of course the method of obtaining JDBC Connection.

  private class GetConnection implements IGetConnection {

                @Override
                public Connection getCon() throws SQLException, ClassNotFoundException {
                        InitialContext ic;
                        DataSource ds;
                        try {
                                ic = new InitialContext();
                                ds = (DataSource) ic.lookup("java:comp/env/jdbc/SAMPLE");
                                Connection c = ds.getConnection();
                                return c;
                        } catch (NamingException e) {
                                throw new ClassNotFoundException(e.getLocalizedMessage());
                        }
                }

        }

The most important thing is defining the data source (server.xml for Tomcat)
    
<Resource auth="Container" driverClassName="com.ibm.db2.jcc.DB2Driver" name="jdbc/SAMPLE" password="db2had1" 
type="javax.sql.DataSource" 
      url="jdbc:db2://think:50001/SAMPLE:clientRerouteAlternateServerName=think;clientRerouteAlternatePortNumber=50002;" 
username="db2had1" >
The crucial point is adding additional connection parameters describing alternative DB2 server participating in HADR configuration. Beside that there is nothing specific in this application.
Additional remarks
  • I reused IJDBCAction implementation from JavaHadr project by means of Eclipse "source link". The only disadvantage that I was unable to use PersonRecord bean as a transient object in GWTHadr application. The nice feature of GWT is the possibility to share code between server and client part. It is possible to achieve that but it requires to decompose JavaHadr application into two parts.
  • Adding additional parameters to URL is not the only method to create DataSource connection HADR enabled. The second method is to create an instance of DB2ClientRerouteServerList and pass it to DataSource as a JNDI entry. It is described here in more detail.

środa, 29 sierpnia 2012

DB2, PostgreSQL, FDW and Linux 64 bit

Introduction
FDW (foreign data wrapper) is a feature in PostgreSQL which allows access to external resources as if they were relational tables in PostreSQL database. There is also ODBC wrapper available so I was interested if it is possible to configure integration with DB2. Finally I was successful but it was a journey littered with troubles.
DB2 data server client
Download and install DB2 data server client. Then configure connection to DB2 database by means of CLP application. In my environment remote DB2 database SAMPLE is created on server think and access port is 50005, user/password db2inst3/db2inst3
db2 "catalog tcpip node DB2SAMPL remove think server 50005"
db2 "catalog database SAMPLE as DB2SAMPL at node DB2SAMPL"
Test the connection just defined:
db2 connect to DB2SAMPL user db2inst3 using db2inst3
db2 list tables
ODBC DB2 connection on Linux
We have to setup ODBC connection with DB2 database (local or remote) on the machine were PostgreSQL is installed.  Be sure that ODBC Linux version is installed, open source unixODBC is available for all Linux distribution. Next step is to configure ODBC access to DB2 database (DB2 Infocenter detailed information) . It can be done by GUI (ODBCConfig) or manually. You have to identify where libdb2.so ODBC driver is located and add the driver definition to /etc/odbcinst.ini file. In my environment this definition looks like:
[DB2]
Description  = UDB 10.1
Driver  = 
Driver64  = /home/opt/ibm/db2/V10.1/lib64/libdb2.so
Setup  = 
Setup64  = 
UsageCount  = 1
CPTimeout  = 0
CPTimeToLive  = 0
DisableGetFunctions  = 0
DontDLCLose  = 1
ExFetchMapping  = 1
Threading  = 3
FakeUnicode  = 0
IconvEncoding  = 
Trace  = 
TraceFile  = 
TraceLibrary  = 
Then define ODBC connection to DB2 database. Add an entry to /etc/odbc.ini file. My entry looks like:
[DB2SAMPL]
Driver = DB2
Database = SAMPLE
Servername = think
UID = db2inst3
PWD = db2inst3
Port = 50005
Next step is to verify that ODBC connection is working by means of isql command :
isql db2sampl db2inst3 db2inst3
+---------------------------------------+
| Connected!                            |
|                                       |
| sql-statement                         |
| help [tablename]                      |
| quit                                  |
|                                       |
+---------------------------------------+
SQL> select * from emp
The last command should yield the content of EMP table created in DB2 SAMPLE database.
Additional remark. In order to have it running we have to catalog DB2 connection using DB2 CLP and ODBC connection also. Also the database alias used in CLP (DB2SAMPL here) should match the DSN name in ODBC. Otherwise the ODBC connection is not working.
Prerequisites in PostgreSQL 
Together with PostgreSQL server additional packages should be installed. In my environment (Fedora 14) I installed these packages via commands:
yum install postgresql-contrib
yum install libpq-dev
yum install postgresql-server-dev.9.1
Make sure that pg_config utility is linked to entry in /usr/bin (or any other public PATH directory). It was not done automatically in my environment.
/usr/bin/pg_config -> /usr/pgsql-9.1/bin/pg_config
Install fdw_odbc extension
 Download solution from repository. Then run command (as root user or via sudo)
make USE_PGXS=1 install
Output:
/bin/mkdir -p '/usr/pgsql-9.1/lib'
/bin/mkdir -p '/usr/pgsql-9.1/share/extension'
/bin/sh /usr/pgsql-9.1/lib/pgxs/src/makefiles/../../config/install-sh -c -m 755  odbc_fdw.so '/usr/pgsql-9.1/lib/odbc_fdw.so'
/bin/sh /usr/pgsql-9.1/lib/pgxs/src/makefiles/../../config/install-sh -c -m 644 ./odbc_fdw.control '/usr/pgsql-9.1/share/extension/'
/bin/sh /usr/pgsql-9.1/lib/pgxs/src/makefiles/../../config/install-sh -c -m 644 ./odbc_fdw--1.0.sql  '/usr/pgsql-9.1/share/extension/'
Configure extension in PostgreSQL 
 Connect to PostgreSQL database and issue the following commands:
CREATE EXTENSION odbc_fdw;
CREATE SERVER odbc_db2 FOREIGN DATA WRAPPER odbc_fdw OPTIONS (dsn 'DB2SAMPL');
CREATE USER MAPPING FOR sb SERVER odbc_db2 OPTIONS (username 'db2inst3', password 'db2inst3');
First test 
To test connection create a simple table in DB2, for instance: DB2 CLP:
db2 "create table testt(x int)"
db2 "insert into testt values(1)"
db2 "insert into testt values(2)"
db2 "insert into testt values(3)"
Then define access to this table in PostgreSQL
test=# CREATE FOREIGN TABLE TESTT (X INT) SERVER odbc_db2 OPTIONS ( sql_query'select x from TESTT', sql_count 'select count(x) from TESTT', x 'X' );
CREATE FOREIGN TABLE
test=# select * from testt;
 x 
---
 1
 2
 3
(3 wiersze)
Next test 
Now define access to EMPLOYEE table in DB2 SAMPLE database (more information)
CREATE FOREIGN TABLE EMPLOYEE (EMPNO CHAR(6), FIRSTNME VARCHAR(12), WORKDEPT CHAR(3), SALARY DECIMAL(9,2)) SERVER odbc_db2 OPTIONS (sql_query 'select cast (empno as CHAR(7)) as empno,firstnme,cast (workdept as CHAR(4)) as workdept,replace(salary,'','',''.'') as salary from employee', sql_count 'select count(*) from employee', EMPNO 'EMPNO', FIRSTNME 'FIRSTNME', WORKDEPT 'WORKDEPT', SALARY 'SALARY')
Then run several statements:
select * from employee;
select * from employee where salary > 70000;
select count(empno),workdept from employee group by workdept order by count(empno);
select max(salary),min(salary),workdept from employee group by workdept;
select count(empno),workdept from employee group by workdept having count(empno) > 5;
One has to remember that foreign tables are "read-only" in PostgreSQL. Cannot be updated and do not participate in transactional processing (more details)
More complicated example
What about joins between foreign and native tables ?
Assume that together with official personal data in SAMPLE database the sleeky employer wants to keep some political incorrect information in a database.
So create additional table in PostgreSQL:

create table secret (empno char(6), politicalviews varchar(100));
insert into secret values('000010','Democratic');
insert into secret values('000020','Democratic');
insert into secret values('000030','Conservative');
insert into secret values('000050','Conservative');
insert into secret values('000060','Liberal');
Then run several statements:
select * from employee e,secret s  where e.empno = s.empno;
select e.*, s.politicalviews from employee e left outer join secret s on e.empno = s.empno;
select e.*, case when s.politicalviews is null then 'Unstable' else s.politicalviews end  from employee e left outer join secret s on e.empno = s.empno;
Let's check the number of people with specified and unspecified political views in the company
select workdept,sum(case when p=1 then 1 else 0 end) as unstable,sum(case when p=0 then 1 else 0 end) as stable  from (select workdept, case when s.politicalviews is null then 1 else 0 end as p from employee e left outer join secret s on e.empno = s.empno) as w group by workdept;
Output:
 workdept | unstable | stable 
----------+----------+----------
 A00      |        4 |        1
 B01      |        0 |        1
 C01      |        3 |        1
 D11      |       10 |        1
 E21      |        6 |        0
 D21      |        7 |        0
 E01      |        0 |        1
 E11      |        7 |        0
Let's try with VIEW:
create view companyandpolitics select workdept,sum(case when p=1 then 1 else 0 end) as unstable,sum(case when p=0 then 1 else 0 end) as stable  from (select workdept, case when s.politicalviews is null then 1 else 0 end as p from employee e left outer join secret s on e.empno = s.empno) as w group by workdept;
select * from politics;
Some additional remarks

CREATE FOREIGN TABLE EMPLOYEE (EMPNO CHAR(6), FIRSTNME VARCHAR(12), WORKDEPT CHAR(3), SALARY DECIMAL(9,2)) SERVER odbc_db2 OPTIONS (sql_query 'select cast (empno as CHAR(7)) as empno,firstnme,cast (workdept as CHAR(4)) as workdept,replace(salary,'','',''.'') as salary from employee', sql_count 'select count(*) from employee', EMPNO 'EMPNO', FIRSTNME 'FIRSTNME', WORKDEPT 'WORKDEPT', SALARY 'SALARY')

  • For some reason the last character is lost if the length of CHAR column is the same in DB2 and foreign table definition. I cannot tell where is the problem: in DB2, DB2 ODBC/CLI, fdw_odbc extension or FDW implementation in PostreSQL. The solution is simply to extend CHAR size in SELECT by DB2 CAST scalar function.
  • DECIMAL. DB2 ODBC/CLI maps DECIMAL column type to CHAR as a default.. In my locale as a decimal point , (colon) is used which is not acceptable by PostgreSQL. So the solution is to use DB2 REPLACE scalar function to replace , (colon) with . (dot). 
  • I did not test date, timestamp, UTF-8 string etc. But - if any problem arises - I hope that it is possible to overcome any issue using method described above. It is also possible to modify the defaults of DB2 ODBC/CLI connection - look for more details.
  • What about BLOB, LOB, XML column ?
  • EMPNO 'EMPNO' - use capital letters (not EMPNO 'empno'). DB2 ODBC/CLI returns all column names in upper case regardless the case used in SELECT statement.

Conclusion
Unfortunately, it was a painful job to setup this FDW for DB2. This solution is almost not documented, error handling is very poor (not existing at all). In case of any problem it can break the whole PostgreSQL or simply brings nothing without any error message. So I had to spend some time to dig through the source code and run this extension with debug mode enabled and additional logging. To my mind the extension requires more thorough test and improvements to be fully trusted.
But the result is amazing - we have a powerful tool for integrating PostgreSQL with DB2.